Creating a Simple Login Page: Beginner’s Guide
A login page is an essential component of almost every web application, providing users with secure access to their accounts. In this project, we’ll demonstrate how to create a minimalist and responsive login page using modern web development techniques. This serves as a foundation for further learning and enhancements.
Project Overview
The login page created in this project has the following features:
- Responsive Design: The page adjusts seamlessly to different screen sizes, ensuring usability across devices.
- Clean User Interface: A minimalistic design approach for a clutter-free experience.
- Form Validation: Basic HTML5 validations to ensure accurate user input.
The complete source code and setup instructions can be found in the GitHub repository.
Technologies Used
- HTML5: For creating the structure of the page.
- CSS3: For styling and layout, ensuring responsiveness and a polished look.
- Node.js: For building the backend functionality.
- Express.js: A web framework for handling routes and requests.
- MySQL: For storing user credentials securely.
Step-by-Step Implementation
1. Setting Up the Environment
Create a folder named login-page-basic and include the following files:
index.htmlstyle.cssserver.js
Install the required Node.js dependencies:
npm init -y
npm install express body-parser mysql2
2. Designing the HTML Layout
Use semantic HTML to structure the login form:
<div class="login-container">
    <h1>Login</h1>
    <form action="/login" method="POST">
        <label for="email">Email</label>
        <input type="email" id="email" name="email" placeholder="Enter your email" required>
        <label for="password">Password</label>
        <input type="password" id="password" name="password" placeholder="Enter your password" required>
        <button type="submit">Login</button>
        <a href="#" class="forgot-password">Forgot Password?</a>
    </form>
</div>
3. Adding CSS for Styling
Style the page using CSS to make it visually appealing:
/* Base styles */
* {
    margin: 0;
    padding: 0;
    box-sizing: border-box;
}

body {
    font-family: Arial, sans-serif;
    background-color: #f3f4f6;
    display: flex;
    justify-content: center;
    align-items: center;
    height: 100vh;
}

.login-container {
    background: #fff;
    padding: 2rem;
    border-radius: 8px;
    box-shadow: 0 4px 6px rgba(0, 0, 0, 0.1);
    width: 100%;
    max-width: 400px;
}

h1 {
    text-align: center;
    margin-bottom: 1rem;
    color: #333;
}

label {
    display: block;
    margin-bottom: 0.5rem;
    color: #555;
}

input {
    width: 100%;
    padding: 0.75rem;
    margin-bottom: 1rem;
    border: 1px solid #ccc;
    border-radius: 4px;
}

input:focus {
    border-color: #007bff;
    outline: none;
}

button {
    width: 100%;
    padding: 0.75rem;
    background-color: #007bff;
    color: white;
    border: none;
    border-radius: 4px;
    font-size: 1rem;
    cursor: pointer;
}

button:hover {
    background-color: #0056b3;
}

.forgot-password {
    display: block;
    margin-top: 1rem;
    text-align: center;
    color: #007bff;
    text-decoration: none;
}

.forgot-password:hover {
    text-decoration: underline;
}
4. Backend Development
Setting Up the Server
Create a server.js file and configure the Express.js server:
const express = require('express');
const bodyParser = require('body-parser');
const mysql = require('mysql2');
const app = express();

// Middleware
app.use(bodyParser.urlencoded({ extended: true }));

// Connect to MySQL database
const db = mysql.createConnection({
    host: 'localhost',
    user: 'root',
    password: 'yourpassword',
    database: 'loginDB'
});

db.connect((err) => {
    if (err) throw err;
    console.log('Connected to MySQL database');
});

// Routes
app.get('/', (req, res) => {
    res.sendFile(__dirname + '/index.html');
});

app.post('/login', (req, res) => {
    const { email, password } = req.body;
    const query = 'SELECT * FROM users WHERE email = ?';

    db.query(query, [email], (err, results) => {
        if (err) {
            res.status(500).send('Database error');
        } else if (results.length > 0) {
            const user = results[0];
            if (user.password === password) {
                res.send('Login successful');
            } else {
                res.send('Incorrect password');
            }
        } else {
            res.send('User not found');
        }
    });
});

// Start server
app.listen(3000, () => {
    console.log('Server is running on port 3000');
});
Database Setup
- Install MySQL and start the MySQL server.
- Create a database named
loginDB. - Create a table named
usersto store user credentials:
CREATE DATABASE loginDB;
USE loginDB;

CREATE TABLE users (
    id INT AUTO_INCREMENT PRIMARY KEY,
    email VARCHAR(255) NOT NULL,
    password VARCHAR(255) NOT NULL
);

INSERT INTO users (email, password) VALUES
('testuser@example.com', 'password123');
This creates a test user for verifying the login functionality.
5. Testing the Project
- Start the server:
node server.js
- Open
http://localhost:3000in your browser. - Test the login functionality by entering valid and invalid credentials.
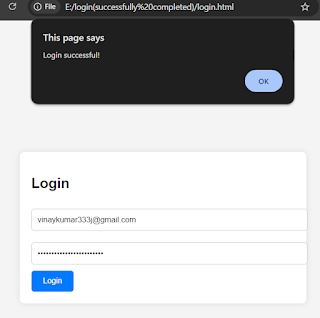
- its look like this
6. Adding Output and Database Screenshots
- Login Page: Below is an image of how the login page looks in the browser.
- Successful Login: This screenshot shows the success message when correct credentials are entered.
- Database Structure: This image shows the structure of the
userstable in MySQL.
Future Enhancements
- Password Hashing:
- Use libraries like bcrypt to store hashed passwords securely.
- Session Management:
- Implement user sessions or tokens (e.g., JWT) for secure authentication.
Conclusion
This project demonstrates the end-to-end creation of a simple login system with a frontend and backend. By integrating MySQL for data storage, Express.js for routing, and responsive design principles, this project serves as a solid foundation for building more advanced web applications.
To explore the complete code and detailed instructions, visit the GitHub repository.


0 Comments