Building a Gmail OTP Sender with Node.js
In this blog post, we’ll explore how to build a Gmail OTP sender application using Node.js. This project is perfect for implementing OTP-based authentication in your applications. We’ll break down each part of the project and explain how the code works, ensuring a comprehensive understanding.
Click here to learn more about securely accessing Gmail OTPs via the internet.
Project Overview
The Gmail OTP Sender is a Node.js application that allows users to send One-Time Passwords (OTPs) to email addresses for authentication purposes. It uses Gmail’s SMTP service to dispatch the OTP securely.
Key Features
- Generate random 6-digit OTPs.
- Send OTPs to specified email addresses via Gmail.
- Provide a simple HTML interface for user interaction.
Setting Up the Project
1. Install Node.js and npm
Ensure Node.js and npm are installed on your system. Check their versions by running:
node --version
npm --version
If not installed, download and install them from the official Node.js website.
2. Clone the Repository
Clone the project repository from GitHub:
git clone https://github.com/Vinaykumarhub/Gmail-OTP-Sender.git
3. Install Dependencies
Navigate to the project directory and install the necessary Node.js packages:
npm install
This will install the dependencies specified in package.json.
4. Configure Environment Variables
Create a .env file in the project root to securely store your Gmail credentials:
EMAIL=your-email@gmail.com
PASSWORD=your-email-password
Replace your-email@gmail.com and your-email-password with your Gmail address and app-specific password. To know more about app specific password click here
for how to know the app specific password 📥click here
Understanding the Code
Project Structure
otp-server.js: The main server file that handles OTP generation and email dispatch.send-otp.html: A simple HTML form for users to input their email addresses..env: A file to securely store sensitive credentials.
Core Dependencies
The application uses the following Node.js packages:
express: Web application framework for handling server routes.nodemailer: Library for sending emails.body-parser: Middleware for parsing incoming request bodies.
Breaking Down otp-server.js
Importing Required Modules
const express = require('express');
const bodyParser = require('body-parser');
const nodemailer = require('nodemailer');
require('dotenv').config();
These modules set up the server, parse request data, send emails, and load environment variables.
Setting Up the Server
const app = express();
const PORT = process.env.PORT || 3000;

app.use(bodyParser.urlencoded({ extended: false }));
app.use(bodyParser.json());
Here, an Express app is created and middleware is added to handle incoming data.
Configuring the Email Transporter
const transporter = nodemailer.createTransport({
  service: 'gmail',
  auth: {
    user: process.env.EMAIL,
    pass: process.env.PASSWORD,
  },
});
The nodemailer transporter is set up to use Gmail’s SMTP service, authenticated with credentials from the .env file.
Generating an OTP
function generateOTP() {
  return Math.floor(100000 + Math.random() * 900000).toString();
}
This function generates a random 6-digit OTP.
Handling OTP Requests
app.post('/send-otp', (req, res) => {
  const { email } = req.body;
  const otp = generateOTP();

  const mailOptions = {
    from: process.env.EMAIL,
    to: email,
    subject: 'Your OTP Code',
    text: `Your OTP code is ${otp}`,
  };

  transporter.sendMail(mailOptions, (error, info) => {
    if (error) {
      return res.status(500).send('Error sending OTP');
    }
    res.status(200).send('OTP sent successfully');
  });
});
When a POST request is made to /send-otp, the server extracts the email address from the request body, generates an OTP, and sends it to the specified email.
Starting the Server
app.listen(PORT, () => {
  console.log(`Server is running on port ${PORT}`);
});
The server starts listening on the specified port, logging a message to the console.
Understanding send-otp.html
This file provides a user-friendly interface:
<!DOCTYPE html>
<html lang="en">
<head>
  <meta charset="UTF-8">
  <title>OTP Sender</title>
</head>
<body>
  <form action="/send-otp" method="post">
    <label for="email">Enter your email:</label>
    <input type="email" id="email" name="email" required>
    <button type="submit">Send OTP</button>
  </form>
</body>
</html>
The form collects an email address and submits it via a POST request to the /send-otp endpoint.
Running the Application
- Start the server:
node otp-server.js
- Open the
send-otp.htmlfile in a web browser. - Enter your email and click "Send OTP."
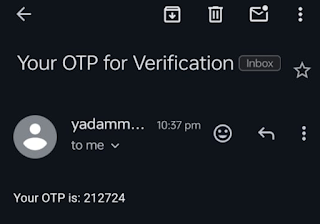
You’ll receive an OTP in your inbox!
The output of the project:
Conclusion
This Gmail OTP Sender project demonstrates how to implement basic email-based authentication using Node.js. It combines the power of Express, Nodemailer, and Gmail’s SMTP service to create a functional and secure application. You can extend this project by adding features like OTP validation and expiration handling.


0 Comments