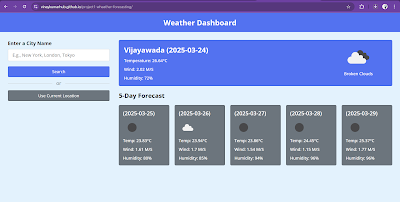
Building a Weather Dashboard with JavaScript
Creating a weather dashboard is a great way to learn JavaScript, API integration, and front-end development. In this blog post, we will walk through building a Weather App using HTML, CSS, and JavaScript.
Features of the Weather App
- Search for weather updates by city name
- Get real-time weather details like temperature, wind speed, and humidity
- Fetch data using an external API
- Display a 5-day weather forecast
- Use the current location to get instant weather updates
Project Setup
To get started, create three files: index.html, style.css, and script.js.
HTML Structure
The HTML file defines the structure of the weather dashboard. Below is the basic setup:
<!DOCTYPE html>
<html lang="en">
<head>
    <meta charset="utf-8">
    <title>Weather App</title>
    <link rel="stylesheet" href="style.css">
    <meta name="viewport" content="width=device-width, initial-scale=1.0">
    <script src="script.js" defer></script>
</head>
<body>
    <h1>Weather Dashboard</h1>
    <div class="container">
        <div class="weather-input">
            <h3>Enter a City Name</h3>
            <input class="city-input" type="text" placeholder="E.g., New York, London, Tokyo">
            <button class="search-btn">Search</button>
            <div class="separator"></div>
            <button class="location-btn">Use Current Location</button>
        </div>
        <div class="weather-data">
            <div class="current-weather"></div>
            <div class="days-forecast">
                <h2>5-Day Forecast</h2>
                <ul class="weather-cards"></ul>
            </div>
        </div>
    </div>
</body>
</html>
Styling with CSS
Create a style.css file to enhance the design of the Weather App. Define styles for input fields, buttons, and weather display sections.
@import url('https://fonts.googleapis.com/css2?family=Open+Sans:wght@400;500;600;700&display=swap');
* {
  margin: 0;
  padding: 0;
  box-sizing: border-box;
  font-family: 'Open Sans', sans-serif;
}
body {
  background: #E3F2FD;
}
h1 {
  background: #5372F0;
  font-size: 1.75rem;
  text-align: center;
  padding: 18px 0;
  color: #fff;
}
.container {
  display: flex;
  gap: 35px;
  padding: 30px;
}
.weather-input {
  width: 550px;
}
.weather-input input {
  height: 46px;
  width: 100%;
  outline: none;
  font-size: 1.07rem;
  padding: 0 17px;
  margin: 10px 0 20px 0;
  border-radius: 4px;
  border: 1px solid #ccc;
}
.weather-data .current-weather {
  color: #fff;
  background: #5372F0;
  border-radius: 5px;
  padding: 20px;
  display: flex;
  justify-content: space-between;
}
.weather-cards {
  display: flex;
  gap: 20px;
}
.weather-cards .card {
  color: #fff;
  padding: 18px 16px;
  list-style: none;
  width: calc(100% / 5);
  background: #6C757D;
  border-radius: 5px;
}
Fetching Weather Data with JavaScript
In the script.js file, use the OpenWeather API to fetch weather details.
const cityInput = document.querySelector(".city-input");
const searchButton = document.querySelector(".search-btn");
const locationButton = document.querySelector(".location-btn");
const currentWeatherDiv = document.querySelector(".current-weather");
const weatherCardsDiv = document.querySelector(".weather-cards");

const API_KEY = "YOUR_API_KEY";

const getWeatherDetails = (cityName, latitude, longitude) => {
    const API_URL = `https://api.openweathermap.org/data/2.5/forecast?lat=${latitude}&lon=${longitude}&appid=${API_KEY}`;

    fetch(API_URL).then(response => response.json()).then(data => {
        const uniqueForecastDays = [];
        const fiveDaysForecast = data.list.filter(forecast => {
            const forecastDate = new Date(forecast.dt_txt).getDate();
            if (!uniqueForecastDays.includes(forecastDate)) {
                return uniqueForecastDays.push(forecastDate);
            }
        });

        cityInput.value = "";
        currentWeatherDiv.innerHTML = "";
        weatherCardsDiv.innerHTML = "";

        fiveDaysForecast.forEach((weatherItem, index) => {
            const html = `<div class="details">
                    <h2>${cityName} (${weatherItem.dt_txt.split(" ")[0]})</h2>
                    <h6>Temperature: ${(weatherItem.main.temp - 273.15).toFixed(2)}°C</h6>
                    <h6>Wind: ${weatherItem.wind.speed} M/S</h6>
                    <h6>Humidity: ${weatherItem.main.humidity}%</h6>
                </div>`;
            if (index === 0) {
                currentWeatherDiv.insertAdjacentHTML("beforeend", html);
            } else {
                weatherCardsDiv.insertAdjacentHTML("beforeend", `<li class="card">${html}</li>`);
            }
        });
    }).catch(() => alert("Error fetching weather data!"));
};
Live Demo and Screenshots
You can view the live demo of this project here. Below are some screenshots of the Weather App:
Weather App Screenshots
Vijayawada
London
No Data Available
Conclusion
This Weather Dashboard is a great beginner-friendly project to practice API integration and JavaScript. You can expand it by adding more features like hourly forecasts, different themes, or even using AI to provide weather insights!


0 Comments